Angular2
Angular 2
Modules
An Angular module, whether a root or feature, is a class with an @NgModule decorator.
// app/app.module.ts
import { NgModule }      from '@angular/core';
import { BrowserModule } from '@angular/platform-browser';
@NgModule({
  imports:      [ BrowserModule ],
  providers:    [ Logger ],
  declarations: [ AppComponent ],
  exports:      [ AppComponent ],  // AppComponent is just for show, no modules will import from root
  bootstrap:    [ AppComponent ]   // They will import from AppComponent instead
})
export class AppModule { }
NgModule is a decorator function that takes a single metadata object whose properties describe the module. The most important are:
-
declarations - the view classes that belong to this module. Angular has three kinds of view classes: components, directives and pipes.
-
exports - subset of declarations that should be visible and usable in the component templates of other modules.
-
imports - other modules whose exported classes are needed by component templates declared in this module.
-
providers creators of services that this module contributes to the global collection of services; they become accessible in all parts of the app.
-
bootstrap - identifies the main application view, called the root component, that hosts all other app views. Only the root module should set this bootstrap property.
Components
A component controls a patch of screen real estate that we could call a view.
 // app/hero-list.component.ts
@Component({
  selector:    'hero-list',
  templateUrl: 'app/hero-list.component.html',
  providers:   [ HeroService ]
 })

export class HeroListComponent implements OnInit {
  heroes: Hero[];
  selectedHero: Hero;

  constructor(private service: HeroService) { }

  ngOnInit() {
    this.heroes = this.service.getHeroes();
  }

  selectHero(hero: Hero) { this.selectedHero = hero; }
}
Templates
A template is a form of HTML that tells Angular how to render the component.
<!-- app/hero-list.component.html -->
<h2>Hero List</h2>
<p><i>Pick a hero from the list</i></p>
<ul>
  <li *ngFor="let hero of heroes" (click)="selectHero(hero)">

  </li>
</ul>
<hero-detail *ngIf="selectedHero" [hero]="selectedHero"></hero-detail>
Metadata
Metadata tells Angular how to process a class.
For below example, in fact, it really is just a class. It’s not a component until we tell Angular about it.
@Component({
  selector:    'hero-list',
  templateUrl: 'app/hero-list.component.html',
  providers:   [ HeroService ]
})
export class HeroListComponent implements OnInit {
/* . . . */
}
Here are a few of the possible @Component configuration options:
-
selector: CSS selector that tells Angular to create and insert an instance of this component where it finds a
<hero-list>tag in parent HTML. For example, if an app’s HTML contains<hero-list></hero-list>, then Angular inserts an instance of the HeroListComponent view between those tags. -
templateUrl: address of this component’s template, which we showed above.
-
directives: array of the components or directives that this template requires. We saw in the last line of our template that we expect Angular to insert a HeroDetailComponent in the space indicated by
<hero-detail>**tags. Angular will do so only if we mention the HeroDetailComponent in this directives array. -
providers: array of dependency injection providers for services that the component requires. This is one way to tell Angular that our component’s constructor requires a HeroService so it can get the list of heroes to display. We’ll get to dependency injection later.
Data binding

A simple template
<div>
  Hello my name is  and I like  quite a lot.
</div>
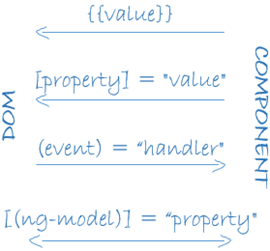
{}: RENDERING
To render a value, we can use the standard double-curly syntax:
<p> My name is </p>
[]: BINDING PROPERTIES
If we have this.currentVolume in our component, we will pass this through to our component and the values will stay in sync:
<video-control [volume]="currentVolume"></video-control>
(): HANDLING EVENTS
To listen for an event on a component, we use the () syntax
<my-component (click)="onClick($event)"></my-component>
[()]: TWO-WAY DATA BINDING
To keep a binding up to date given user input and other events, use the [()] syntax. Think of it as a combination of handling an event and binding a property:
<input [(ngModel)]="myName">
The this.myName value of your component will stay in sync with the input value.
*: THE ASTERISK
* indicates that this directive treats this component as a template and will not draw it as-is.
For example, ngFor takes our <my-component> and stamps it out for each item in items, but it never renders our initial <my-component> since it’s a template:
<my-component *ngFor="#item of items">
</my-component>
Directives
Angular templates are dynamic. When Angular renders them, it transforms the DOM according to the instructions given by directives.
There are three kinds of directives in Angular:
- Components
- Structural directives
- Attribute directives
Structural directives
Structural directives can change the DOM layout by adding and removing DOM elements. NgFor and NgIf are two familiar examples.
<!-- app/hero-list.component.html -->
<li *ngFor="let hero of heroes"></li>
<hero-detail *ngIf="selectedHero"></hero-detail>
*ngFortells Angular to stamp out one<li>per hero in the heroes list.*ngIfincludes the HeroDetail component only if a selected hero exists.
Attribute directives
An Attribute directive can change the appearance or behavior of an element. The built-in NgStyle directive, for example, can change several element styles at the same time.
<div [ngStyle]="{'color': color, 'font-size': size, 'font-weight': 'bold'}">
  style using ngStyle
</div>

<input [(ngModel)]="color" />
<button (click)="size = size + 1">+</button>
<button (click)="size = size - 1">-</button>

<div [ngClass]="['bold-text', 'green']">array of classes</div>
<div [ngClass]="'italic-text blue'">string of classes</div>
<div [ngClass]="{'small-text': true, 'red': true}">object of classes</div>
Services
Service is a broad category encompassing any value, function, or feature that our application needs. There is nothing specifically Angular about services. Angular itself has no definition of a service.
// app/logger.service.ts
export class Logger {
  log(msg: any)   { console.log(msg); }
  error(msg: any) { console.error(msg); }
  warn(msg: any)  { console.warn(msg); }
}
// app/hero.service.ts
export class HeroService {
  private heroes: Hero[] = [];

  constructor(
    private backend: BackendService,
    private logger: Logger) { }

  getHeroes() {
    this.backend.getAll(Hero).then( (heroes: Hero[]) => {
      this.logger.log(`Fetched ${heroes.length} heroes.`);
      this.heroes.push(...heroes); // fill cache
    });
    return this.heroes;
  }
}
Dependency injection

@Injectable()
- is a decorator which tells the
typescriptthat decorated class hasdependenciesand does not mean that this class can be injected in some other. - And then TypeScript understands that it needs to Inject the required metadata into decorated class when constructing, by using the
importeddependencies.
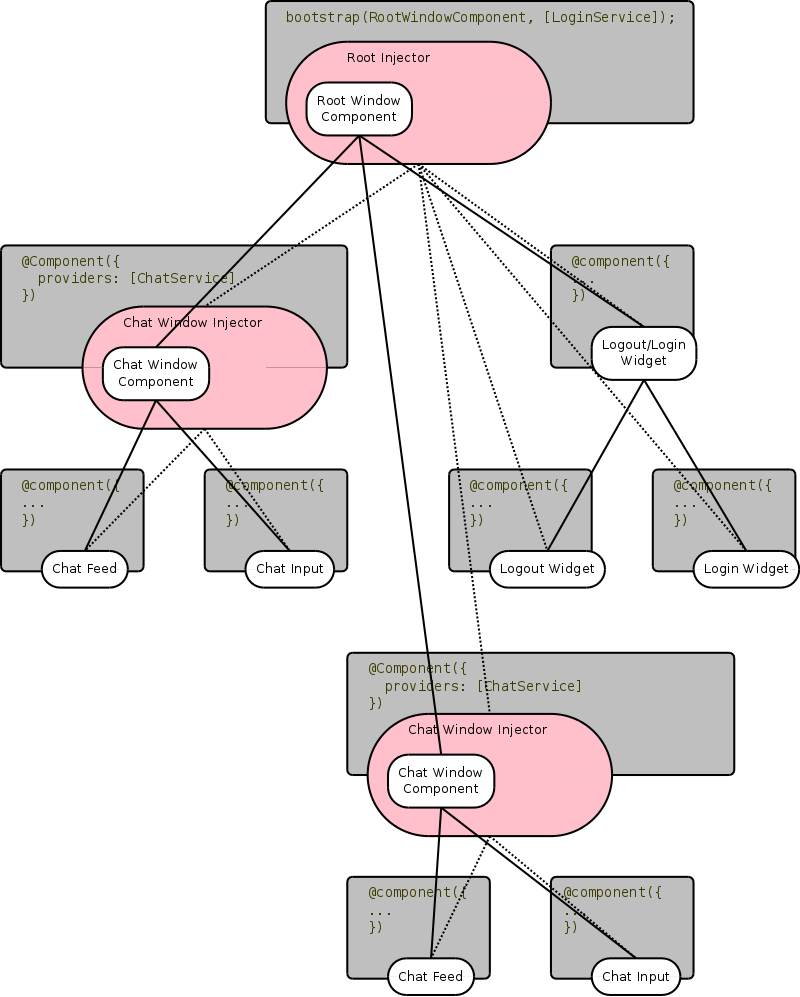
bootstrap(app, [service])
- bootstrap() takes care of creating a root injector for our application when it’s bootstrapped. It takes a list of providers as second argument which will be passed straight to the injector when it is created.
- You bootstrap your application with the services that are gonna be used in many places like
Http, which also means you’ll not need to writeproviders: [Http]in your class configuration.
providers: [service]
- providers also does the work of passing all the services’ arguments to
Injector. - You put services in providers if it’s not
bootstrap()pedwith. And is needed only in a few places.
@Inject()
- is a function that does the work of actually injecting those services
like this.
constructor(@Inject(NameService) NameService) - but if you use TS all you need to do is this
constructor(NameService: NameService)and typescript will handle the rest.
Aliased class providers
The Provider class and provide object literal
We wrote the providers array like this:
providers: [Logger]
This is actually a short-hand expression for a provider registration using a provider object literal with two properties:
[{ provide: Logger, useClass: Logger }]
Sometimes we want to create alias.
[ NewLogger,
  // Not aliased! Creates two instances of `NewLogger`
  { provide: OldLogger, useClass: NewLogger}]
The solution: alias with the useExisting option.
[ NewLogger,
  // Alias OldLogger w/ reference to NewLogger
  { provide: OldLogger, useExisting: NewLogger}]